FEATURES
- Brush motor for 1800 series.
- Heat assembly: 76��C (169��F) thermostat
- Adjustable sensitive distance from 10-30 cm for auto dryer.
- Adjustable timer 30-60 seconds for push button
dryer.
- Built in overheat safety switch.
- 2 vandal-proof lock screws and key wrench.
- CE/LVD/EMC/UL listed
GENERAL SPECIFICATIONS
| Model |
Heater |
Motor |
RPM |
CFM |
Sound Level |
| 1800PA/DA/DS |
1800W |
1/8HP |
3450 |
171 |
55+/-db |
ELECTRICAL SPECIFICATIONS
| Model |
Volts |
Amps |
Watts |
Hz |
Drying Cycle |
|
1800PA/DA/DS |
120 |
15 |
1800 |
60 |
30Sec |
DIMENSIONS & WEIGHT
| Model |
Dimension |
Shipping Weight |
|
1800PA |
10.5"Wx8.75"Hx6.75"D |
10 LBS |
|
1800DA/DS |
9"Wx8.5"Hx7"D |
11 LBS |
WARRANTY
In addition to Sky's one year guarantee, Sky
extends a limited 3 year warranty from the date of
installation on all parts to the original owner of the
installed unit against defects in factory workmanship or
material under normal use and service. This warranty is
limited to the repair or exchange of defective parts at the
option of SKY.
GENERAL SAFETY INFORMATION
- Disconnect power before installation or servicing.
- This product intended for installation by a
qualified service person. Use AWG No.12 solid conductor
for wiring.
- All units must be supplied with a 3-wire service.
The ground wire must be connected to the dryer's
backplate.
- Failure to properly ground unit could result in
severe electrical shock and / or death.
- Do not install dryer over washbasin.
INSTALLATION
1. Fix the position card on the wall. Suitable height for
hole "D" IS 50" from ground.
2. Drill 4 holes (A.B.C.D. 5/16" diameter and 3/8" depth.)
3. Take off the mounting instruction sheet. Hammer dowel
into 4 holes.
4. Remove the housing fromthe base plate; fix the base
plate firmly on to the wall.
5. Connections:
- Connect the live wire (colored red or brown) to the
terminal block marked "L".
- Connect the natural wire (colored black or blue) to
the terminal blocked marked "N".
- Connect the ground wire (colored green and yellow)
to the green screw marked "".
6. Attach housing back to base plate.
RECOMMENDED MOUNTING HEIGHT (Distance from floor)
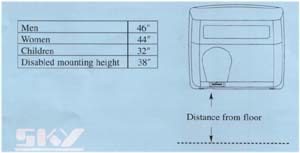 |